How to translate Custom Content
Some text on your storefront never appears in Shopify's translation system. Anything a developer typed directly into a theme file, and most text added by other apps, is invisible to Shopify — and therefore to every translation app, including Lokalize.
Custom Content solves this. You give Lokalize the exact text as it appears on your storefront, Lokalize translates it, and the Lokalize storefront widget swaps it in your customer's language.
Custom Content is currently in Beta.
When to use Custom Content
Use it for text that never shows up on the other Translations tabs:
- Headings and labels typed directly into a theme section, such as a custom Liquid block
- Announcement bars, badges, and buttons added by your theme developer
- Text added by another Shopify app that has no translation feature of its own
Check the other tabs first. Products, collections, pages, navigation, and standard theme content are already translatable on their own tabs, and those translations are server-rendered, which is better for SEO. Custom Content is for the text that is left over.
Step 1: Add and AI-enable a language
- In Lokalize, open the Languages page from the left sidebar.
- Click Add Languages and pick the languages you want to translate into.
- For each language, toggle on AI Enabled.
- Publish the language so it appears on your storefront.
If the language already shows as AI Enabled and published, skip this step.
Step 2: Turn on the storefront widget
Custom text is swapped by a Lokalize theme block. If the block is off, your translations are saved but nothing changes on your storefront.
- In Lokalize, open Settings → Switchers from the left sidebar.
- Find the Image and Custom Translation Widget card.
- Click Go to theme editor.
- Turn the widget on in your theme editor and click Save.
If the card already shows Active, the widget is enabled and you can skip this step.
Step 3: Open the Custom Content tab
- Open the Translations page from the left sidebar.
- In the language picker at the top right, choose the language you want to translate into.
- In the tab bar, click Custom Content.
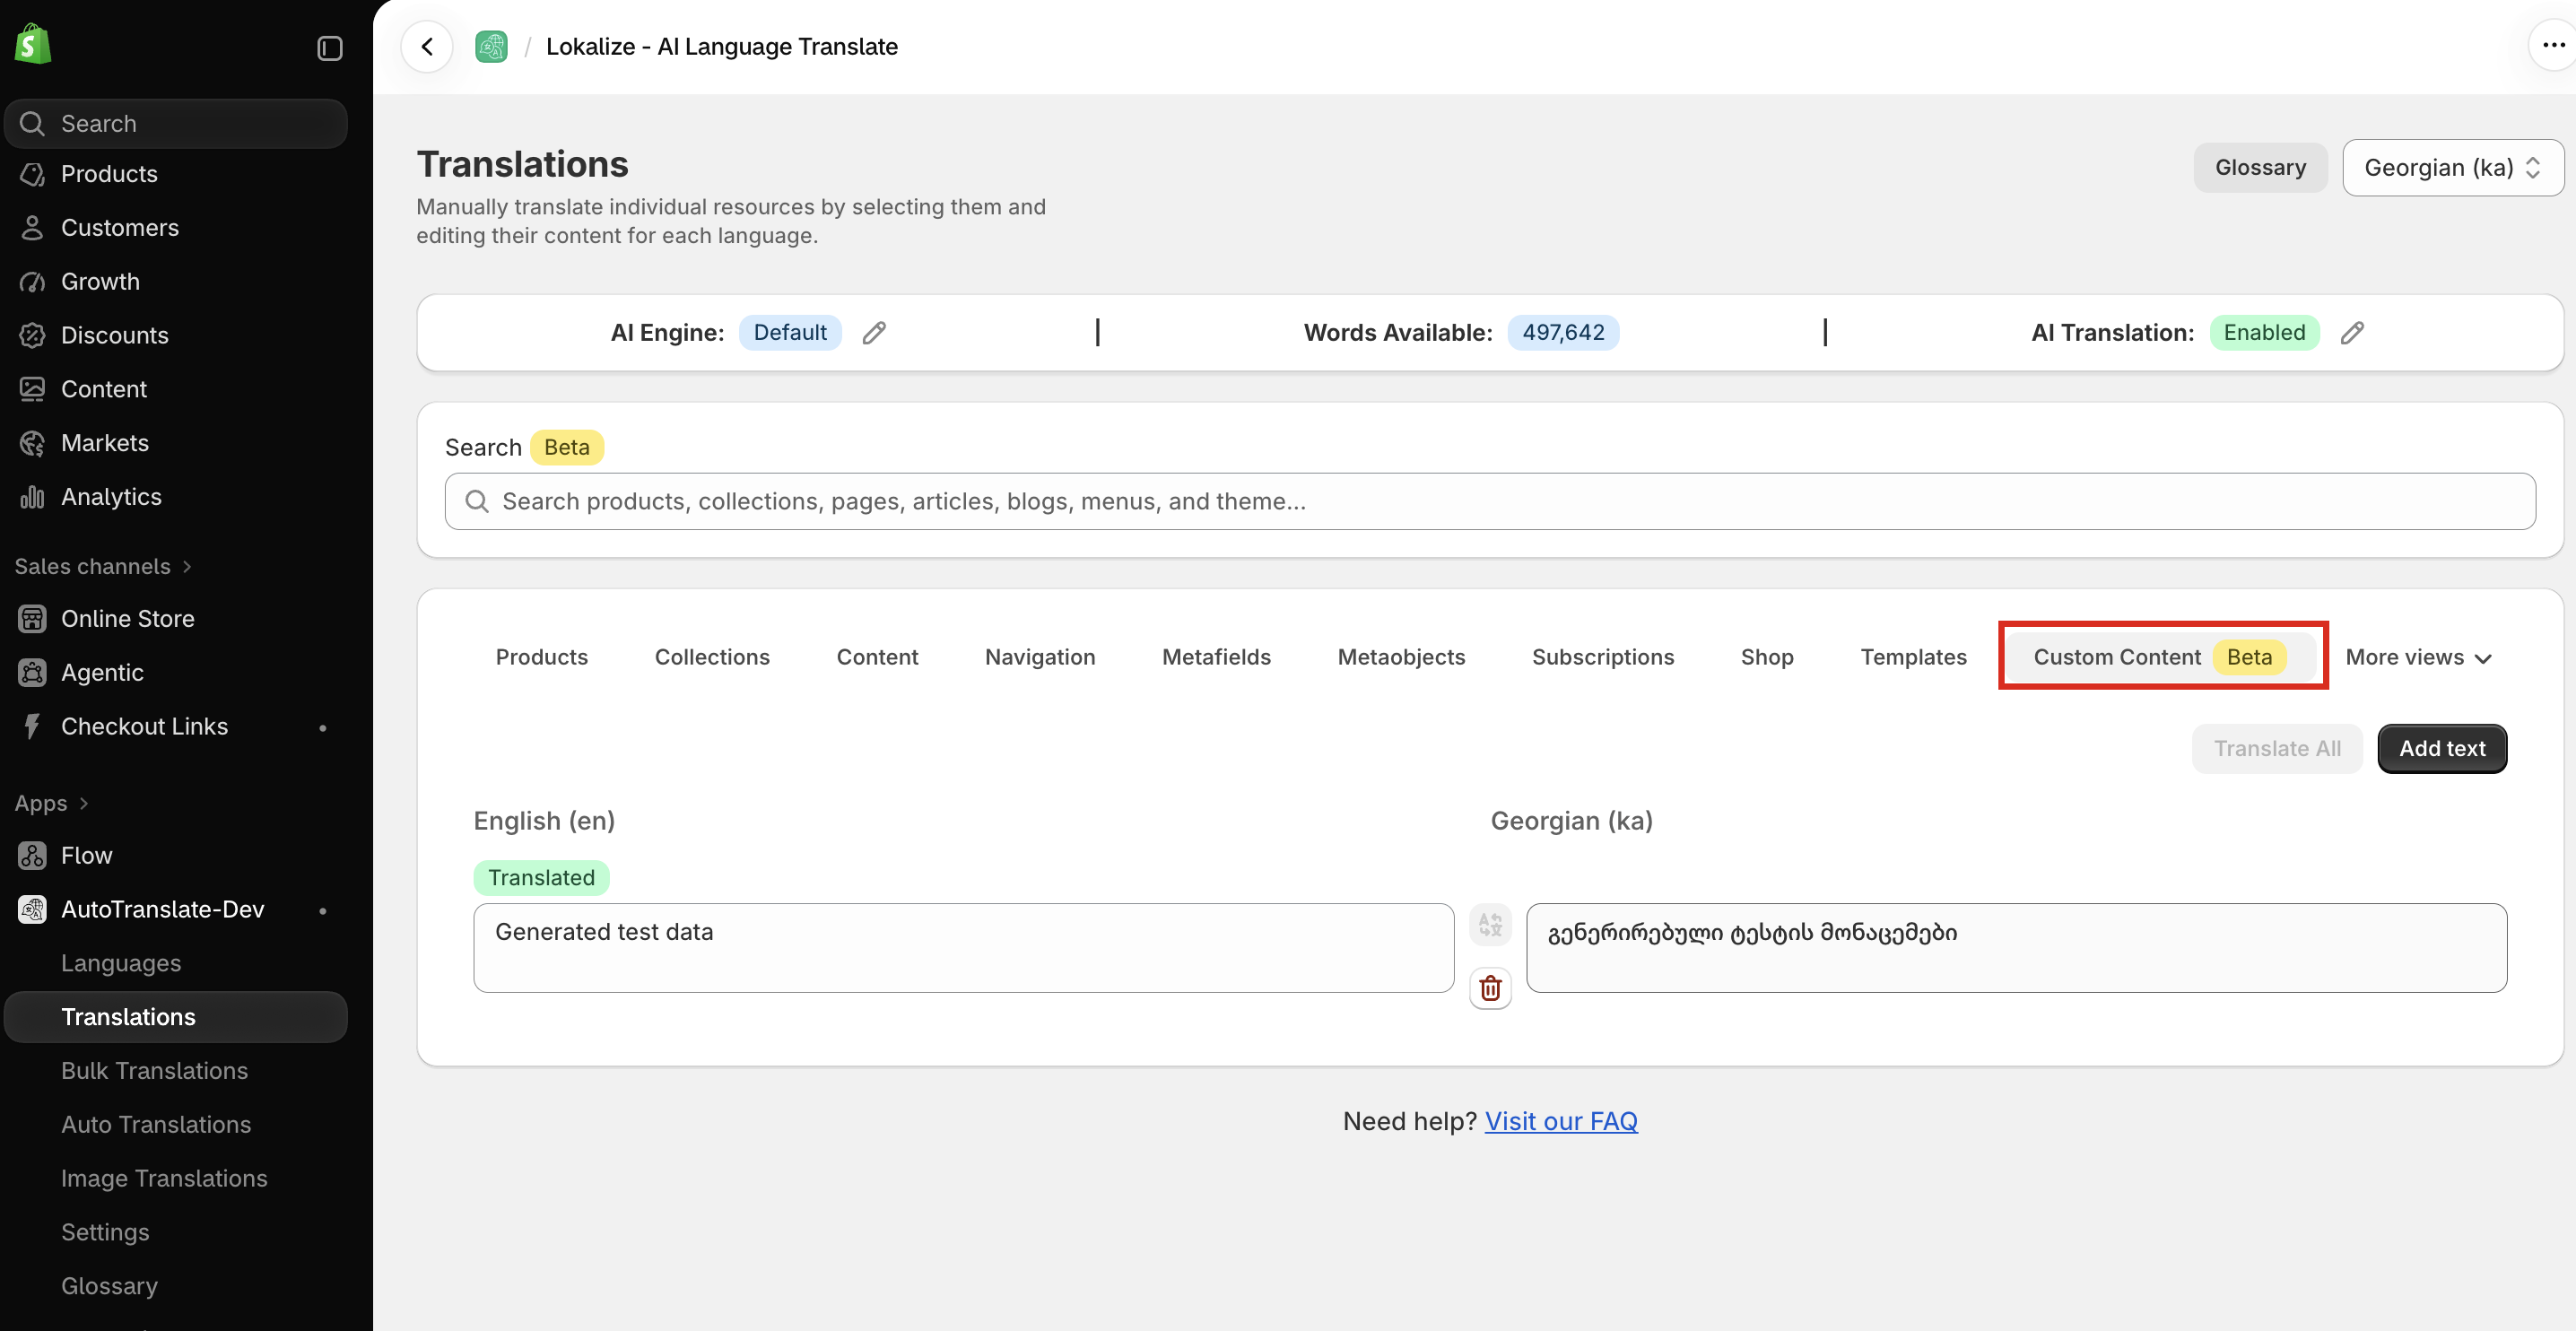
Step 4: Add the text from your storefront
- Open your storefront in another tab and find the text you want to translate.
- Copy it exactly as it appears.
- Back in Lokalize, click Add text.
- Paste the text into the Add Text from your storefront field.
- Click Add.
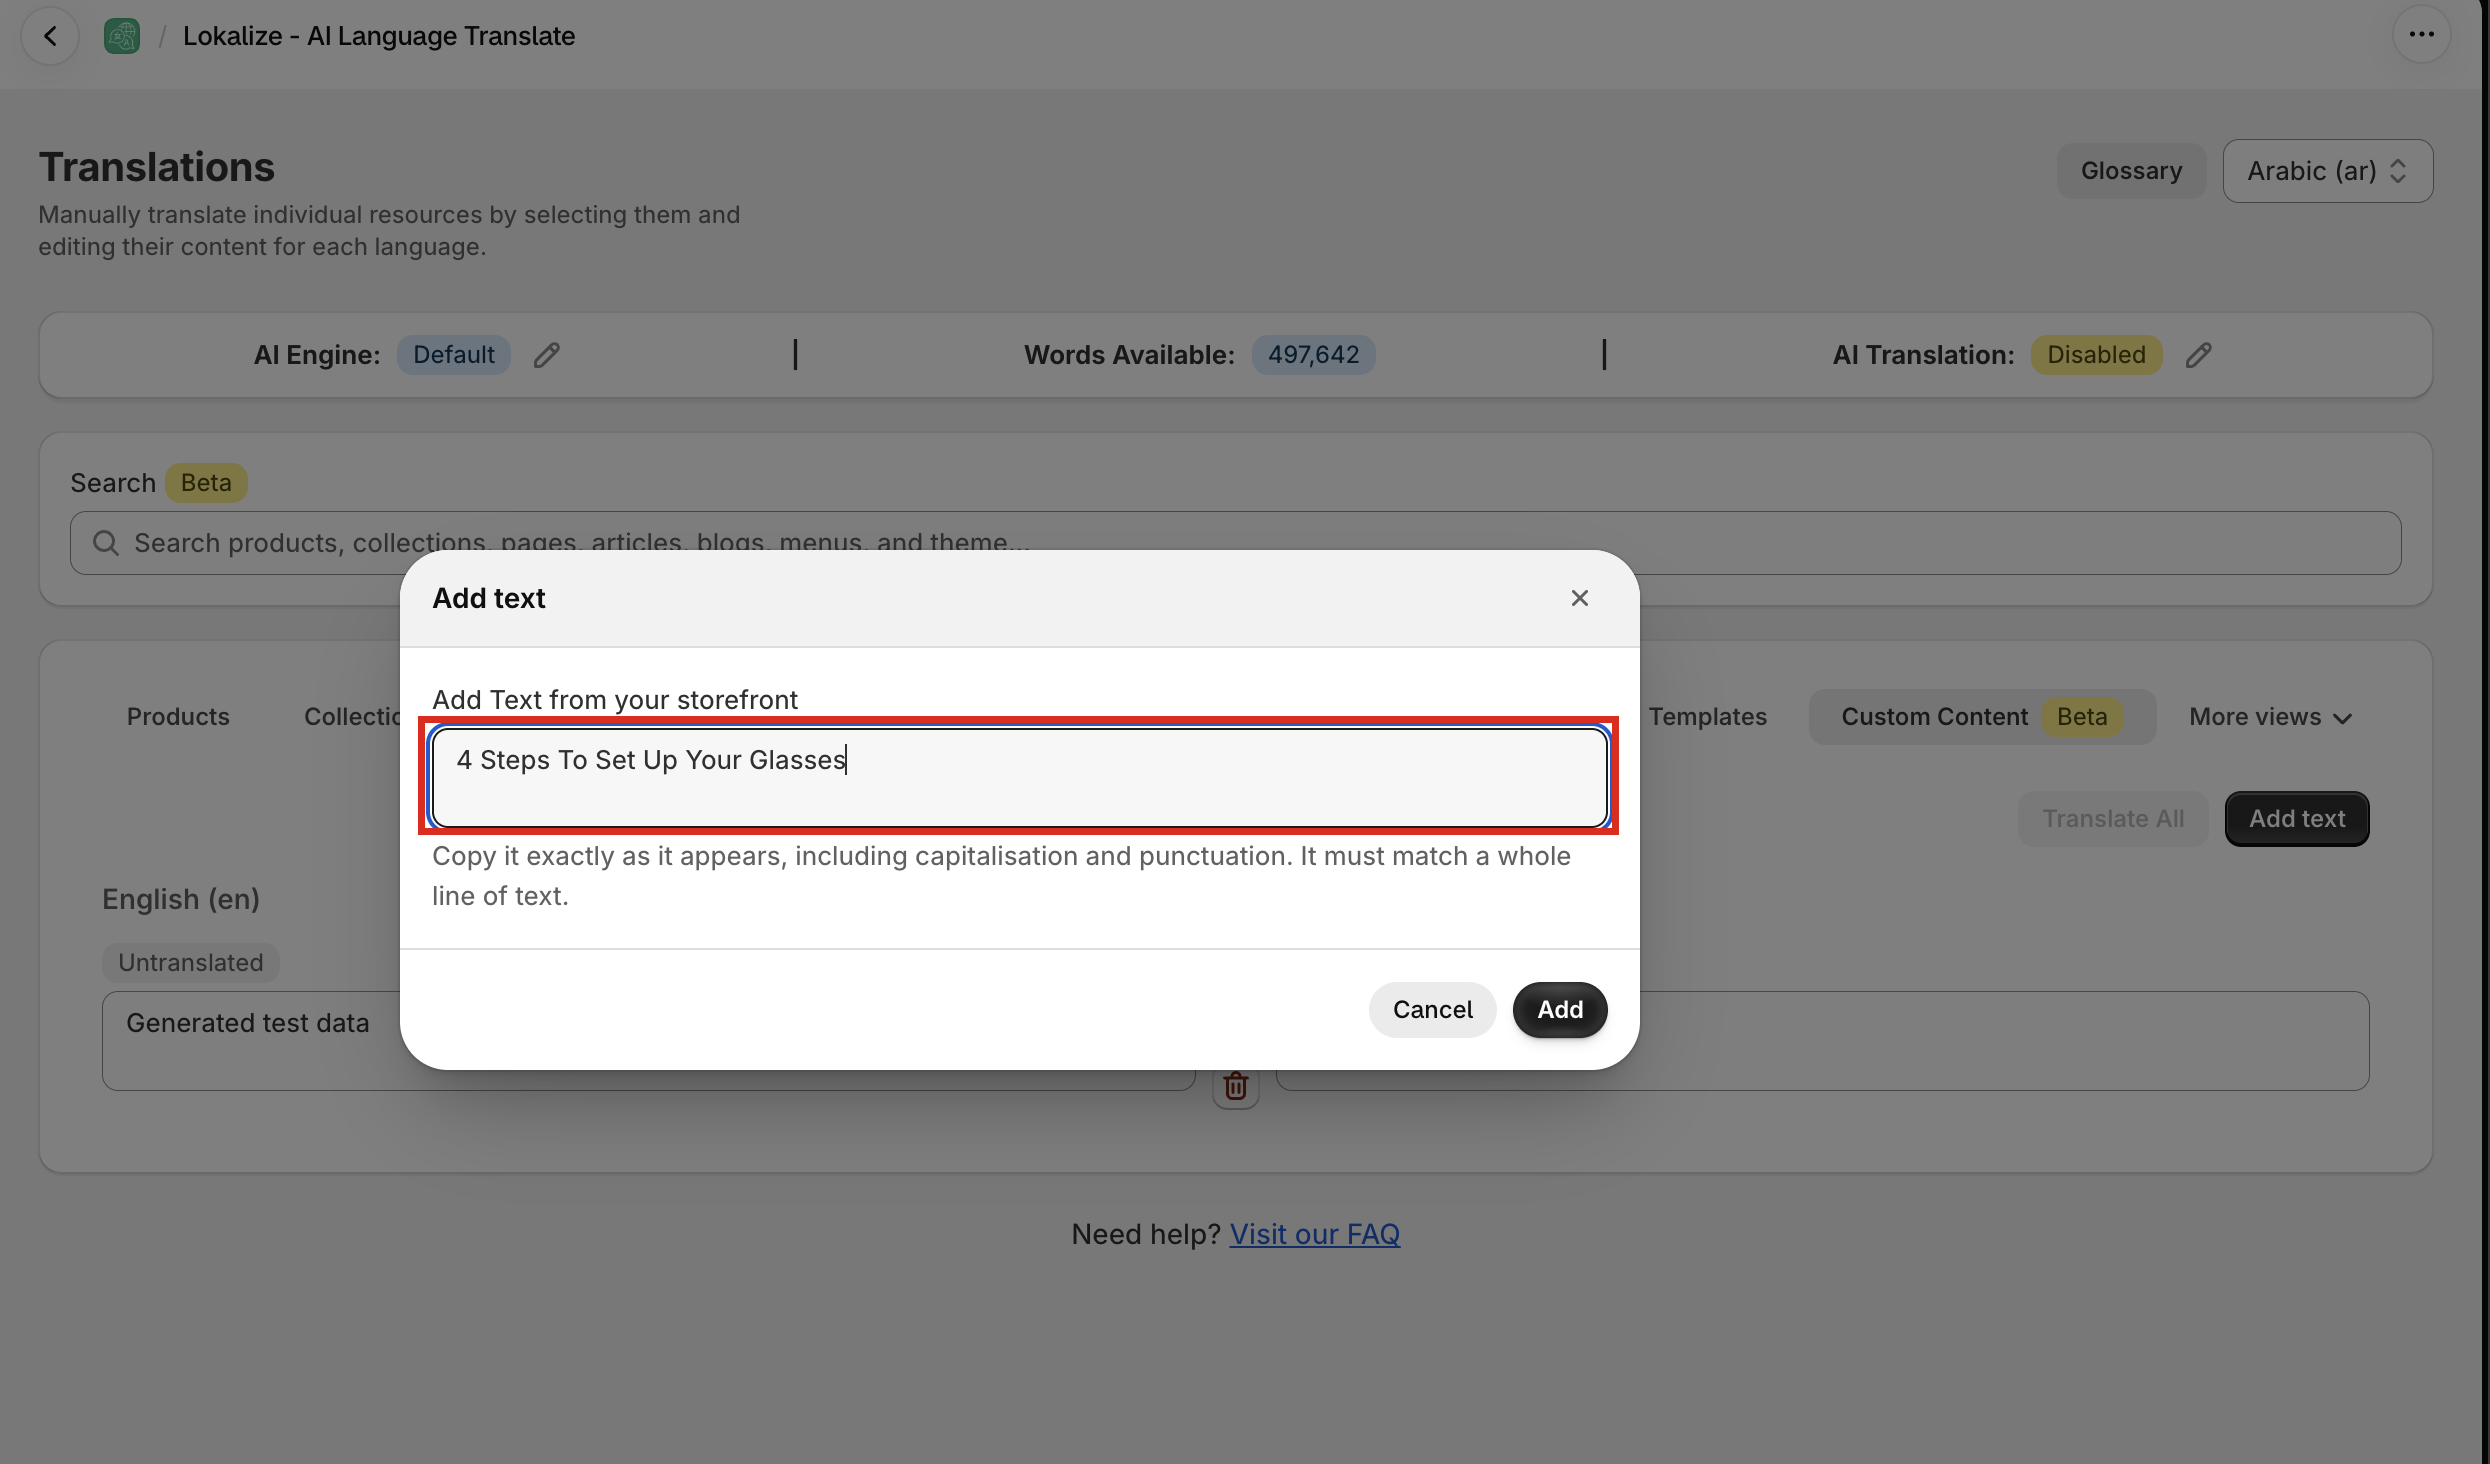
The text must match a whole line exactly, including capitalisation and punctuation. Free shipping over €50 will not match Free Shipping Over €50, and it will not match a line that only contains those words as part of a longer sentence. Extra spaces and line breaks are ignored, so you do not need to be precise about those.
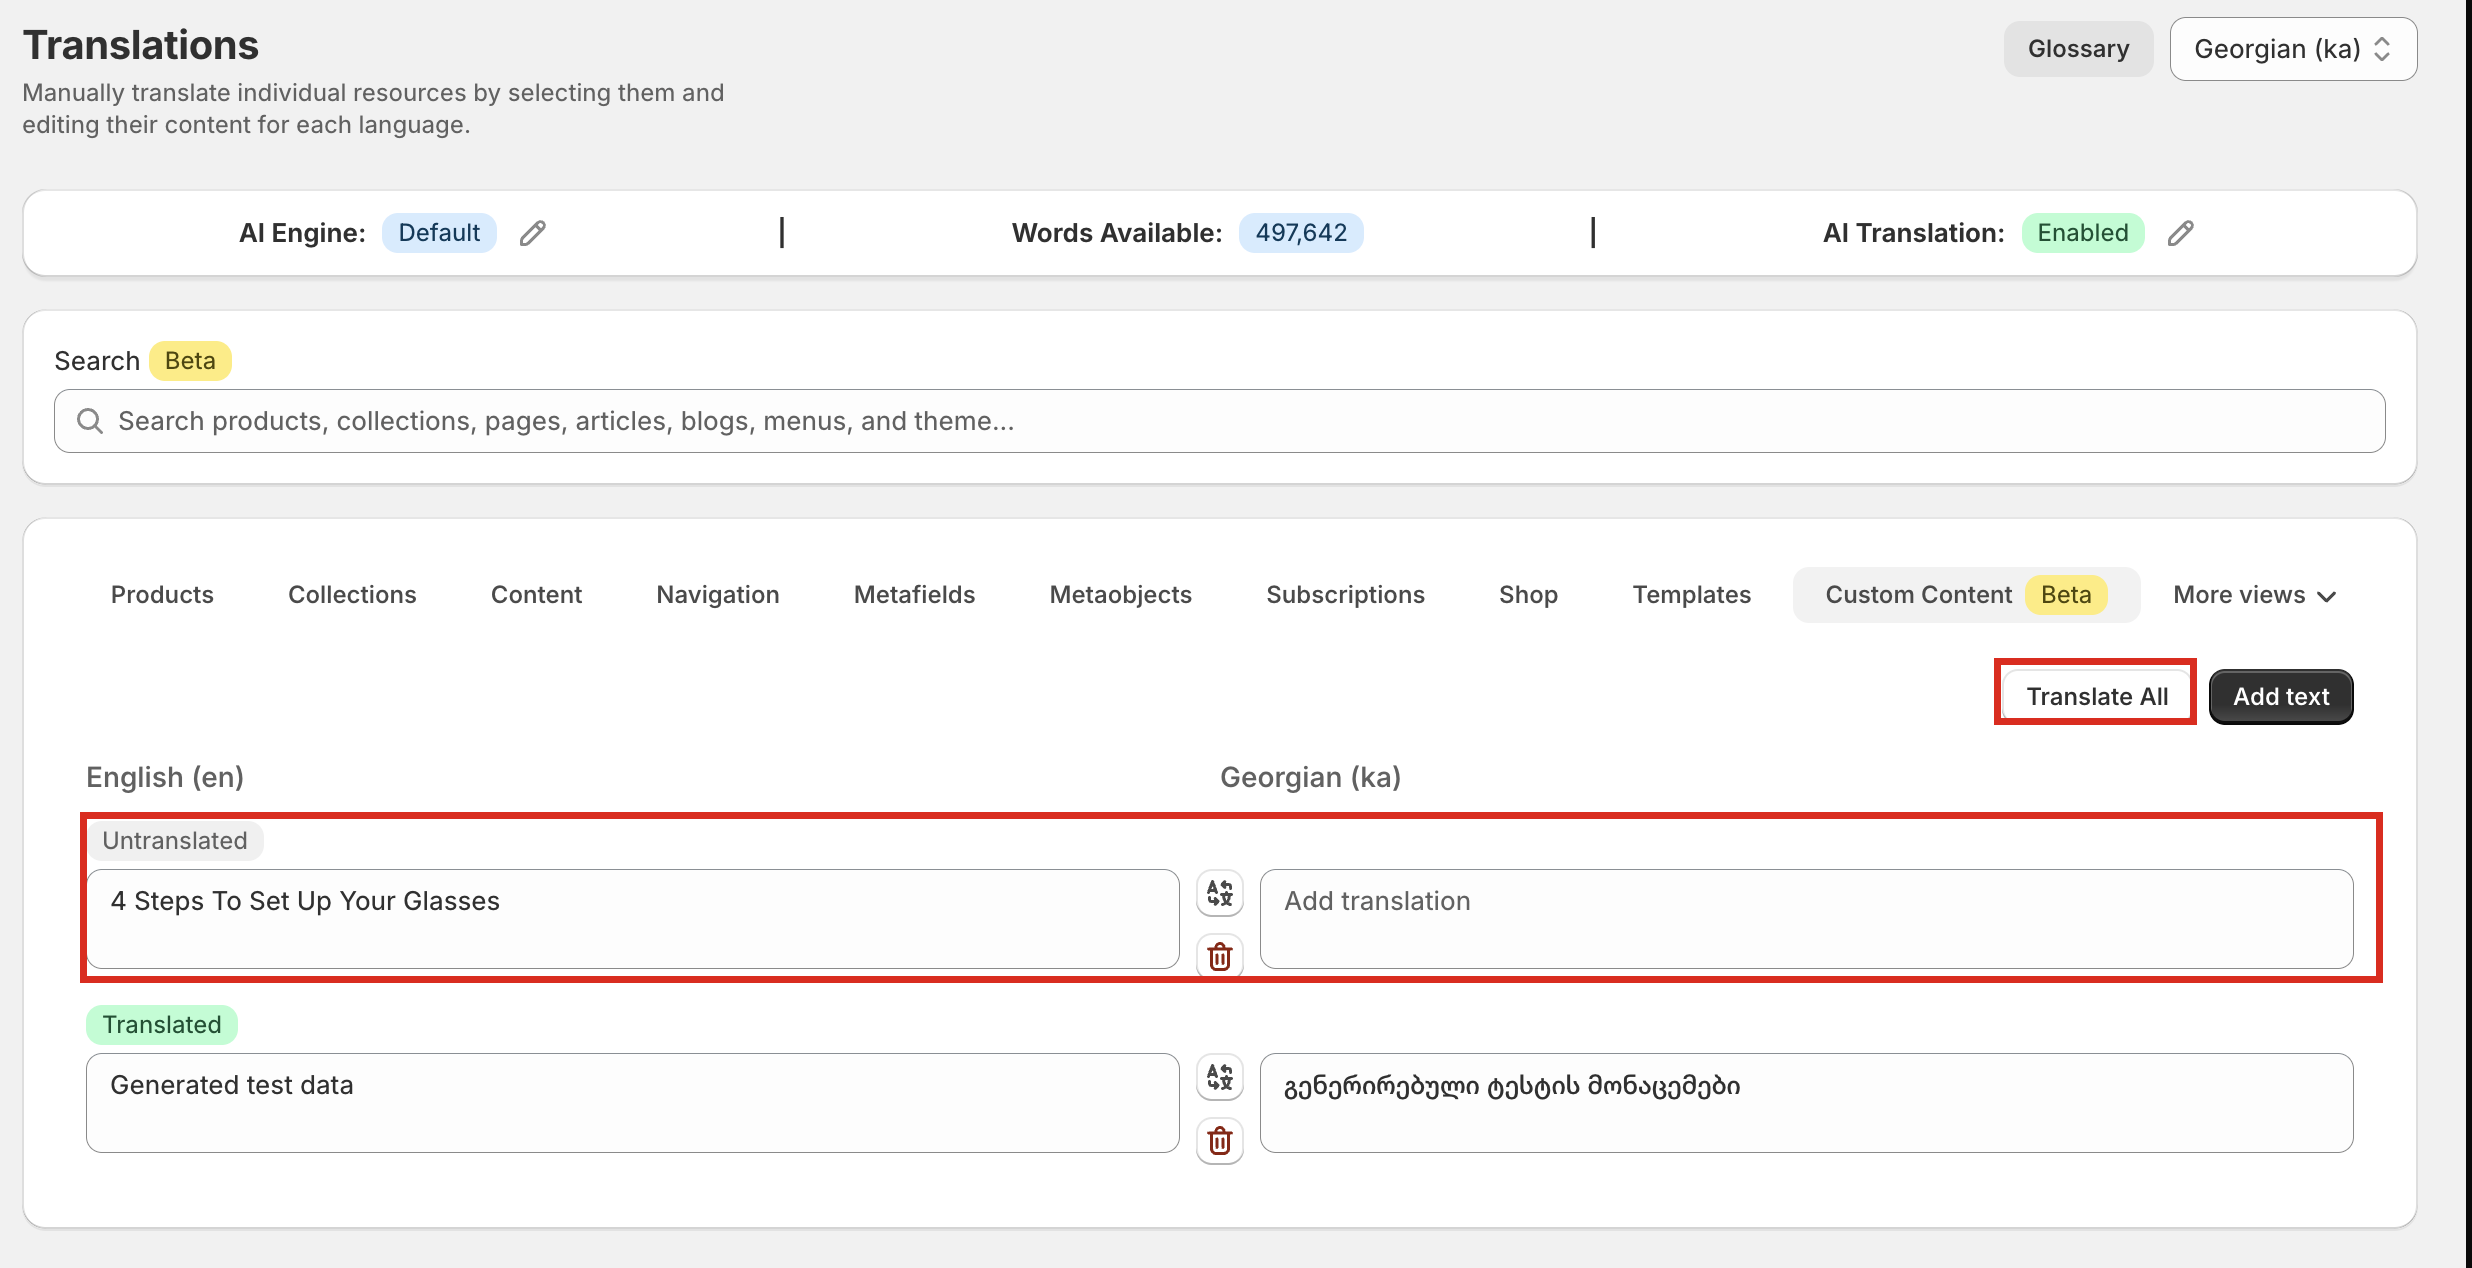
Your new text appears in the list marked Untranslated, with the source on the left and an empty translation on the right.
If part of your text is bold, a link, or a different colour
A line that looks like one sentence on your storefront is often several separate pieces of text underneath. Take this, written in a custom Liquid section:
Hi <strong>how are you</strong>?
On the page it reads as a single sentence — Hi how are you? — but your theme stores it as three separate pieces:
| Piece | Why |
|---|---|
Hi | before the bold tag |
how are you | inside the bold tag |
? | after the bold tag |
Lokalize matches one piece at a time, so adding the whole sentence Hi how are you? matches nothing and the text stays in English.
Instead, add each piece as its own entry:
- Click Add text and add
Hi. - Click Add text again and add
how are you. - Translate both, as in Step 5.
There is no need to add ? — punctuation is the same in most languages, and it stays where it is.
Your storefront then shows Bonjour comment allez-vous? with the bold still on the middle part.
Two things to watch when you split a sentence this way:
- A piece is replaced everywhere it appears. If you add
Hion its own, every standaloneHion the page becomesBonjour— not just the one in this sentence. Prefer longer, more distinctive pieces. - The word order cannot change. Each piece is translated on its own and stays in its original position, so a language that would naturally reorder the sentence will read a little awkwardly.
If the sentence matters — a headline, a promise, anything a customer reads closely — the better fix is to ask your developer to make it one piece of text, or to move it into your theme's locale file. Splitting is the workaround, not the ideal.
Step 5: Translate the text
Pick whichever fits — all three save to the same place.
Option A: Translate everything at once (recommended)
- Make sure the correct language is selected in the language picker.
- Click Translate All.
Lokalize translates every entry that does not yet have a translation in that language. Entries that are already translated are skipped, so you never pay twice for the same text.
Option B: Translate one entry
Click the translate icon next to any row. This one always re-translates, even if the row already has a translation — use it when you want a fresh result for a single entry.
Option C: Write the translation yourself
- Type your wording into the field on the right.
- Click Save in the bar that appears at the bottom of the page.
Custom Content does not save automatically. If you edit a field and navigate away without clicking Save, your change is lost. While you have unsaved changes, Translate All, Add text, and the delete buttons are disabled until you save or discard.
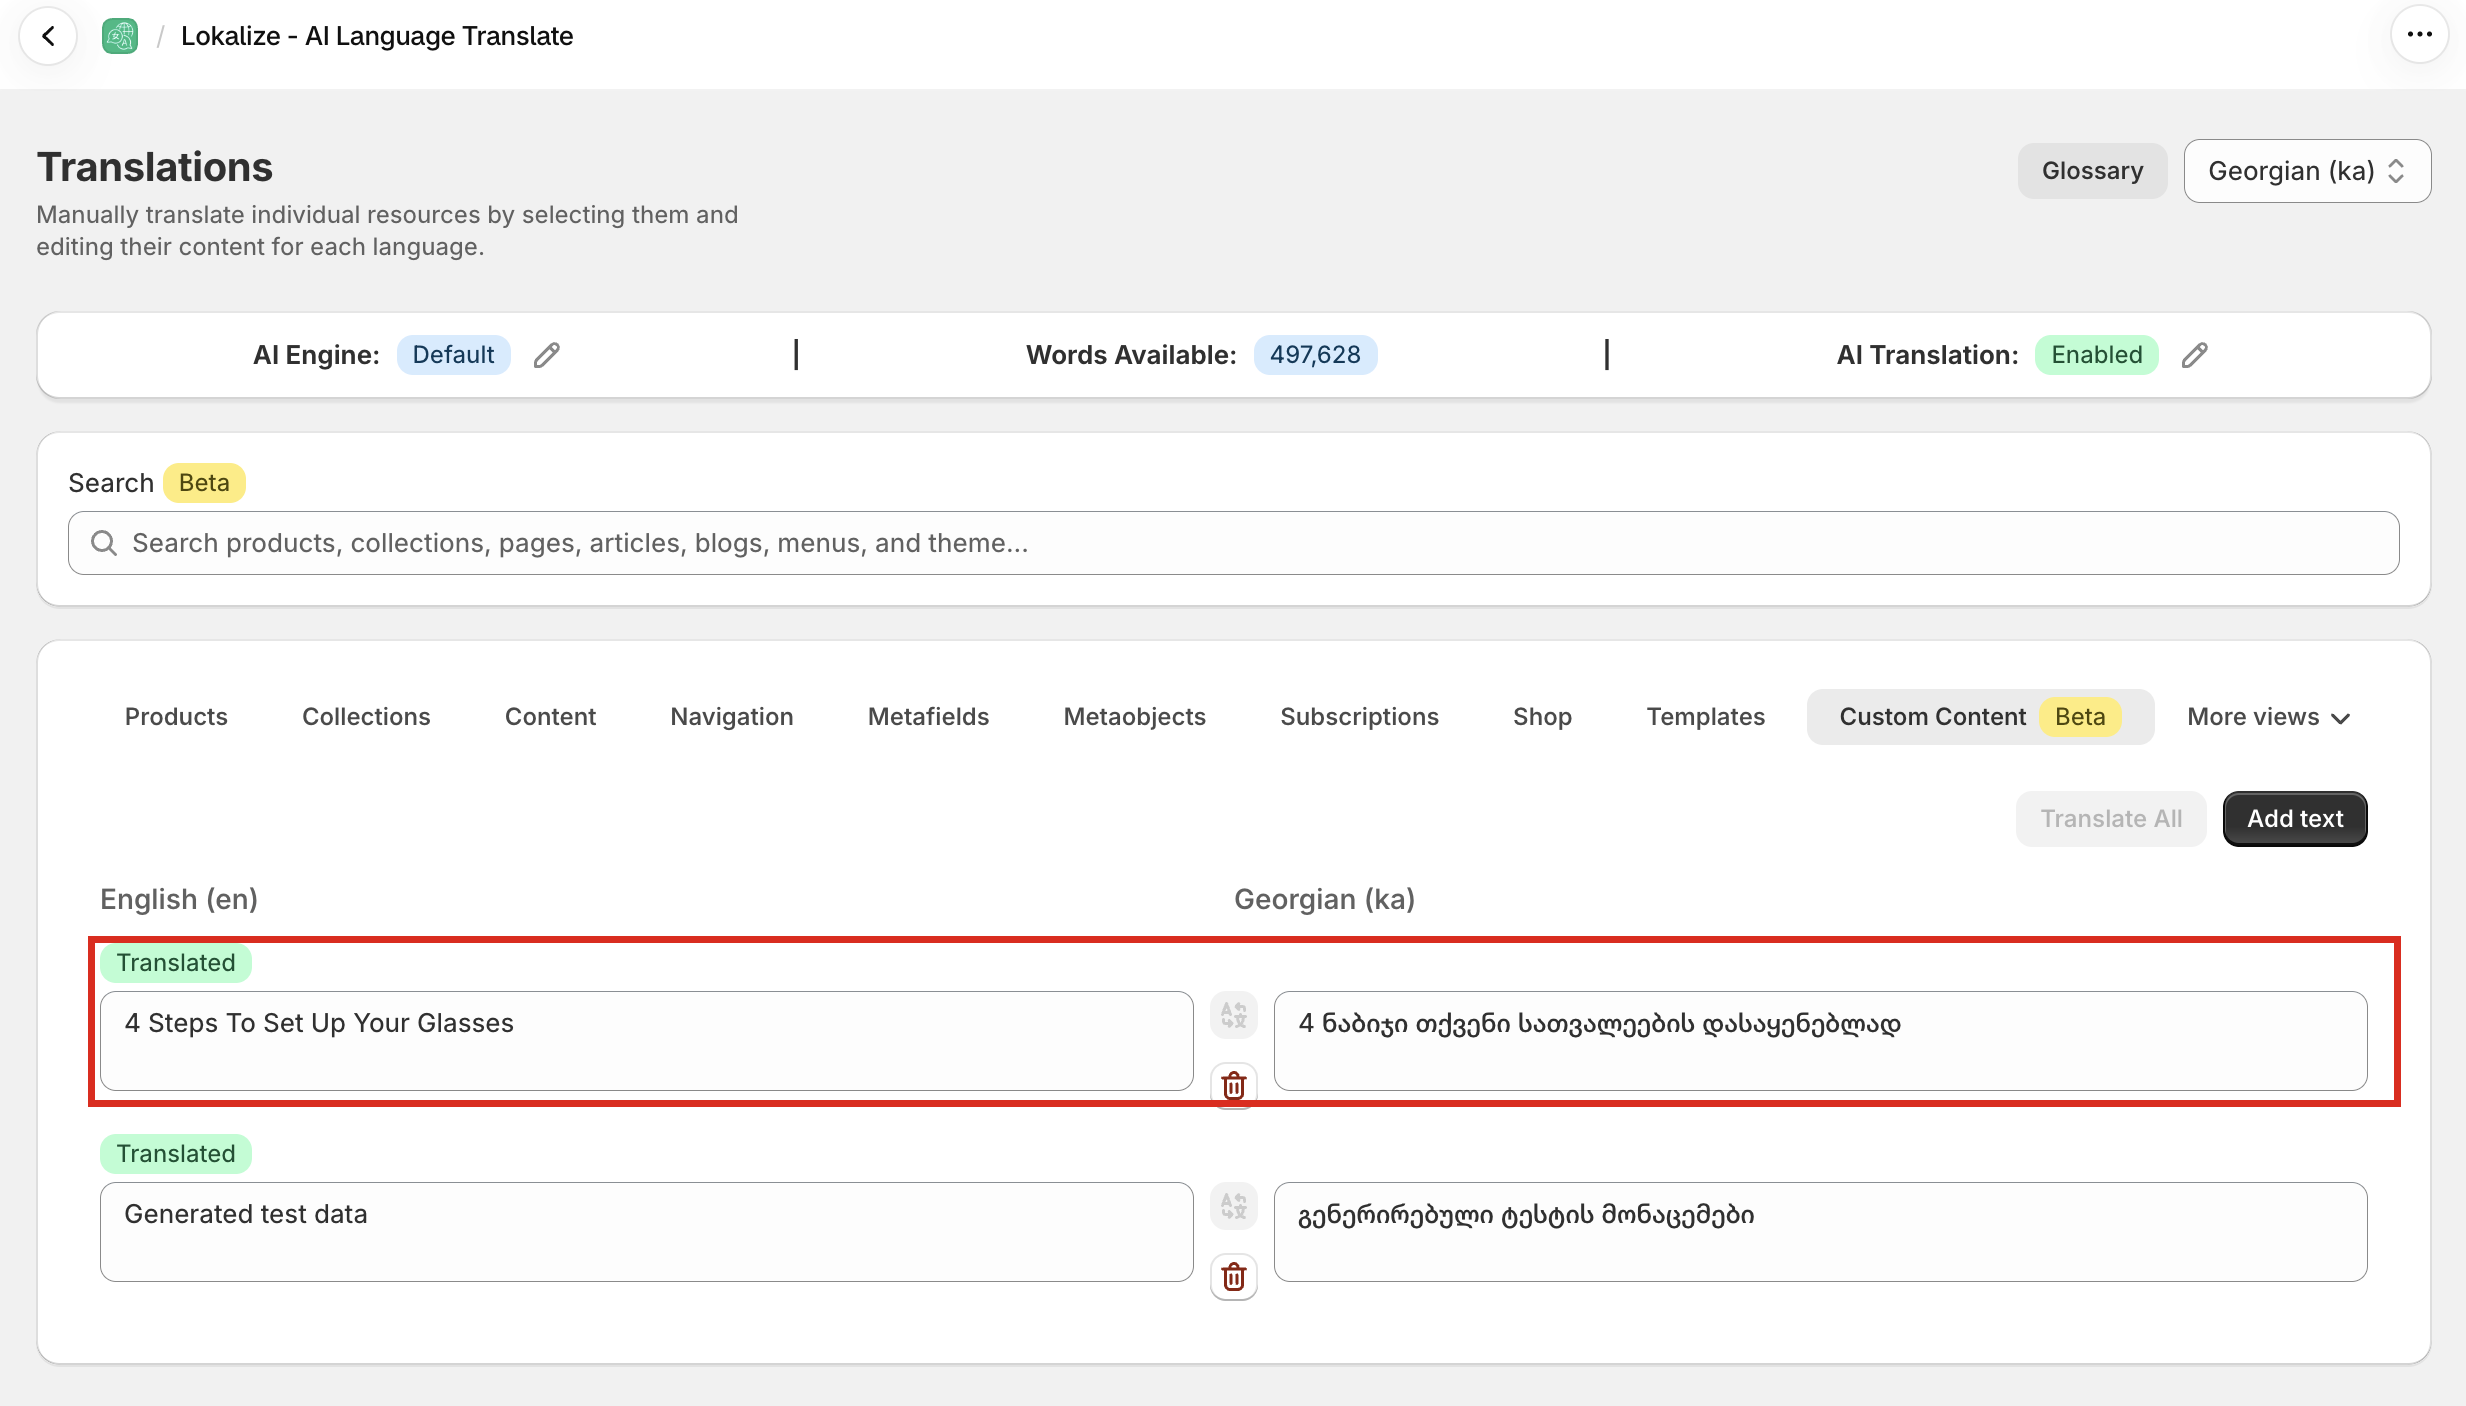
When a row is translated it is marked Translated and shows your source text alongside the translation.
Step 6: Translate custom text in bulk (optional)
Custom text is also available on the Bulk Translate page, which is the quickest way to fill in a language you have just added.
- Open the Bulk Translate page from the left sidebar.
- In the resource list, tick Custom Text.
- In the language picker, select every language you want to translate into.
- Click Translate.
Step 7: Check your storefront
- Open your storefront in the language you translated into — usually by adding the language to the URL, for example
yourstore.com/fr/. - Find the text you added. It should now appear in the translated language.
You will only see the change on a published language and on that language's URL. On your default language the original text is shown, which is correct.
Good to know
Custom Content does not work on the checkout page. Shopify does not allow apps to change checkout content this way.
- Custom text is replaced in the customer's browser. Search engines see your original text, not the translation. For text you want indexed, ask your developer to move it into your theme's locale file instead — Lokalize then translates it on the Theme tab, where it is rendered by Shopify and fully indexable.
- Deleting an entry removes its translations in every language, not just the one you are viewing.
- Translations count against your word balance like any other AI translation.
Frequently asked questions
I added the text but nothing changed on my storefront. Why?
Work through these in order:
- Is the Image and Custom Translation Widget active on the Switchers page? (Step 2)
- Is the language published, and are you viewing that language's URL?
- Does the row show Translated for that specific language? Each language is translated separately.
- Does your text match the storefront exactly? Capitalisation and punctuation must be identical.
- Is part of the line bold, a link, or a different colour? Then it is stored as several separate pieces and the whole sentence will never match. See If part of your text is bold, a link, or a different colour.
Does Custom Content help my SEO?
No. The swap happens in the browser after the page loads, so search engines index your original text. Every other Lokalize tab produces server-rendered translations that are fully indexable. If a piece of text matters for SEO, it belongs in your theme's locale file rather than here.
What happens when I run out of credits?
AI translation stops until you have credits again. Everything already translated stays in place. You can wait for your monthly allowance to reset or buy a word pack to continue immediately.
What happens to my custom text if I uninstall Lokalize?
Custom text is stored by the app, so it is removed when the app is uninstalled and your storefront returns to showing the original text. Translations of your products, collections, pages, and theme content are stored by Shopify and stay in place.